
搜索到
5
篇与
的结果
-
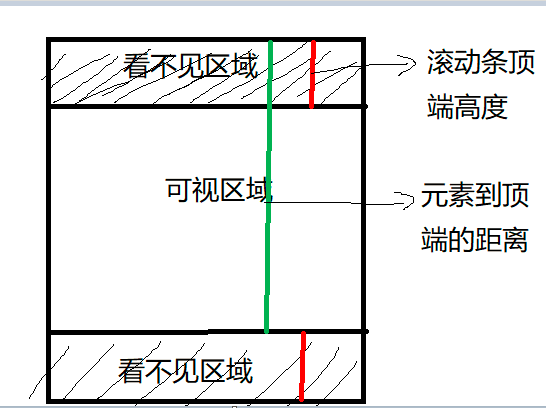
 如何判断一个元素是否在可视区域中? 一、用途可视区域即我们浏览网页的设备肉眼可见的区域,如下图在日常开发中,我们经常需要判断目标元素是否在视窗之内或者和视窗的距离小于一个值(例如 100 px),从而实现一些常用的功能,例如:图片的懒加载列表的无限滚动计算广告元素的曝光情况可点击链接的预加载二、实现方式判断一个元素是否在可视区域,我们常用的有三种办法:offsetTop、scrollTopgetBoundingClientRectIntersection ObserveroffsetTop、scrollTopoffsetTop ,元素的上外边框至包含元素的上内边框之间的像素距离,其他offset属性如下图所示:下面再来了解下clientWidth、clientHeight:clientWidth:元素内容区宽度加上左右内边距宽度,即clientWidth = content + paddingclientHeight:元素内容区高度加上上下内边距高度,即clientHeight = content + padding这里可以看到client元素都不包括外边距最后,关于scroll系列的属性如下:scrollWidth 和 scrollHeight 主要用于确定元素内容的实际大小scrollLeft 和 scrollTop 属性既可以确定元素当前滚动的状态,也可以设置元素的滚动位置垂直滚动 scrollTop > 0 水平滚动 scrollLeft > 0将元素的 scrollLeft 和 scrollTop 设置为 0,可以重置元素的滚动位置注意上述属性都是只读的,每次访问都要重新开始下面再看看如何实现判断:公式如下:el.offsetTop - document.documentElement.scrollTop <= viewPortHeight代码实现:function isInViewPortOfOne (el) { // viewPortHeight 兼容所有浏览器写法 const viewPortHeight = window.innerHeight || document.documentElement.clientHeight || document.body.clientHeight const offsetTop = el.offsetTop const scrollTop = document.documentElement.scrollTop const top = offsetTop - scrollTop return top <= viewPortHeight }getBoundingClientRect返回值是一个DOMRect对象,拥有left, top, right, bottom, x, y, width, 和height属性const target = document.querySelector('.target'); const clientRect = target.getBoundingClientRect(); console.log(clientRect); // { // bottom: 556.21875, // height: 393.59375, // left: 333, // right: 1017, // top: 162.625, // width: 684 // }属性对应的关系图如下所示:当页面发生滚动的时候,top与left属性值都会随之改变如果一个元素在视窗之内的话,那么它一定满足下面四个条件:top 大于等于 0left 大于等于 0bottom 小于等于视窗高度right 小于等于视窗宽度实现代码如下:function isInViewPort(element) { const viewWidth = window.innerWidth || document.documentElement.clientWidth; const viewHeight = window.innerHeight || document.documentElement.clientHeight; const { top, right, bottom, left, } = element.getBoundingClientRect(); return ( top >= 0 && left >= 0 && right <= viewWidth && bottom <= viewHeight ); }Intersection ObserverIntersection Observer即重叠观察者,从这个命名就可以看出它用于判断两个元素是否重叠,因为不用进行事件的监听,性能方面相比getBoundingClientRect会好很多使用步骤主要分为两步:创建观察者和传入被观察者创建观察者const options = { // 表示重叠面积占被观察者的比例,从 0 - 1 取值, // 1 表示完全被包含 threshold: 1.0, root:document.querySelector('#scrollArea') // 必须是目标元素的父级元素 }; const callback = (entries, observer) => { ....} const observer = new IntersectionObserver(callback, options);通过 new IntersectionObserver 创建了观察者 observer ,传入的参数 callback 在重叠比例超过 threshold 时会被执行关于callback回调函数常用属性如下:// 上段代码中被省略的 callback const callback = function(entries, observer) { entries.forEach(entry => { entry.time; // 触发的时间 entry.rootBounds; // 根元素的位置矩形,这种情况下为视窗位置 entry.boundingClientRect; // 被观察者的位置举行 entry.intersectionRect; // 重叠区域的位置矩形 entry.intersectionRatio; // 重叠区域占被观察者面积的比例(被观察者不是矩形时也按照矩形计算) entry.target; // 被观察者 }); };传入被观察者通过 observer.observe(target) 这一行代码即可简单的注册被观察者const target = document.querySelector('.target'); observer.observe(target);三、案例分析实现:创建了一个十万个节点的长列表,当节点滚入到视窗中时,背景就会从红色变为黄色Html结构如下:<div class="container"></div>css 样式如下:.container { display: flex; flex-wrap: wrap; } .target { margin: 5px; width: 20px; height: 20px; background: red; }往 container 插入1000个元素const $container = $(".container"); // 插入 100000 个 <div class="target"></div> function createTargets() { const htmlString = new Array(100000) .fill('<div class="target"></div>') .join(""); $container.html(htmlString); }这里,首先使用 getBoundingClientRect 方法进行判断元素是否在可视区域function isInViewPort(element) { const viewWidth = window.innerWidth || document.documentElement.clientWidth; const viewHeight = window.innerHeight || document.documentElement.clientHeight; const { top, right, bottom, left } = element.getBoundingClientRect(); return top >= 0 && left >= 0 && right <= viewWidth && bottom <= viewHeight; }然后开始监听 scroll 事件,判断页面上哪些元素在可视区域中,如果在可视区域中则将背景颜色设置为 yellowconst $targets = document.querySelectorAll('.target'); $(window).on('scroll', () => { console.log('scroll !'); Array.from($targets).forEach((element) => { console.log(element); if (isInViewPort(element)) { $(element).css('background-color', 'yellow'); } }); });通过上述方式,可以看到可视区域颜色会变成黄色了,但是可以明显看到有卡顿的现象,原因在于我们绑定了 scroll 事件, scroll 事件伴随了大量的计算,会造成资源方面的浪费。下面通过 Intersection Observer 的形式同样实现相同的功能首先创建一个观察者const observer = new IntersectionObserver(getYellow, { threshold: 1.0 });getYellow 回调函数实现对背景颜色改变,如下:function getYellow(entries, observer) { entries.forEach(entry => { if (entry.isIntersecting){ $(entry.target).css("background-color", "yellow"); observer.unobserve(entry.target) } }); }最后传入观察者,即 .target 元素Array.from($targets).forEach((element) => { observer.observe(element); });可以看到功能同样完成,并且页面不会出现卡顿的情况。参考文献https://developer.mozilla.org/zh-CN/docs/Web/API/Element/getBoundingClientRecthttps://developer.mozilla.org/zh-CN/docs/Web/API/Intersection_Observer_API
 -
关于SpringBlade前端UI项目3.x版本路由懒加载和keep-alive三级路由缓存失效优化方案 SpringBlade前端UI项目在使用过程中发现路由并没有懒加载,项目登录成功后所有的资源文件会全部加载,随着项目功能越来越多,首次加载的资源也会越来越多,会造成性能问题。目前最突出的一个问题就是,重新刷新页面,页面会出现空白,随着项目越大,这个空白时间会越长。基于上面说的问题,我对 /src/router/avue-router.js 文件进行了优化,以下是完整代码。import website from '@/config/website' const modules = import.meta.glob('../**/**/*.vue') // 优化路由懒加载核心代码 const loadPageNotFound = () => { return () => import('@/components/error-page/404.vue') } const loadView = (view) => { let res = null for (const path in modules) { if (path.indexOf(view) !== -1) { res = () => modules[path]() return res } } return res } function isURL (s) { return /^http[s]?:\/\/.*/.test(s) } let RouterPlugin = function () { this.$router = null; this.$store = null; } RouterPlugin.install = function (option = {}) { this.$router = option.router; this.$store = option.store; let i18n = option.i18n.global this.$router.$avueRouter = { safe: this, // 设置标题 setTitle: (title) => { const defaultTitle = i18n.t('title'); title = title ? `${title} | ${defaultTitle}` : defaultTitle; document.title = title; }, closeTag: (value) => { let tag = value || this.$store.getters.tag; if (typeof value === 'string') { tag = this.$store.getters.tagList.find(ele => ele.fullPath === value) } this.$store.commit('DEL_TAG', tag) }, generateTitle: (item, props = {}) => { let query = item[props.query || 'query'] || {} let title = query.name || item[props.label || 'label'] let meta = item[props.meta || 'meta'] || {} let key = meta.i18n if (key) { const hasKey = i18n.te('route.' + key) if (hasKey) return i18n.t('route.' + key) } return title.split(',')[0]; }, //动态路由 formatRoutes: function (aMenu = [], first) { const aRouter = [] const propsDefault = website.menu if (aMenu && aMenu.length === 0) return; for (let i = 0; i < aMenu.length; i++) { const oMenu = aMenu[i]; let path = oMenu[propsDefault.path], component = oMenu.component, name = oMenu[propsDefault.label] + ',' + oMenu.id, icon = oMenu[propsDefault.icon], children = oMenu[propsDefault.children], query = oMenu[propsDefault.query], meta = oMenu[propsDefault.meta]; if (option.keepAlive) { meta.keepAlive = option.keepAlive } const isChild = !!(children && children.length !== 0); const oRouter = { path: path, component: (() => { // 判断是否为首路由 if (first) { return loadView(option.store.getters.isMacOs ? '/page/index/layout.vue' : '/page/index/index.vue') // 判断是否为多层路由 } else if (isChild && !first) { return loadView('/page/index/layout.vue') // 判断是否为最终的页面视图 } else { let result = loadView(component + '.vue') return result || loadPageNotFound() } })(), name, icon, meta, query, redirect: (() => { if (!isChild && first) return `${path}` else return ''; })(), // 处理是否为一级路由 children: !isChild ? (() => { if (first) { oMenu[propsDefault.path] = `${path}`; let result = loadView(component + '.vue') return [{ component: result || loadPageNotFound(), icon: icon, name: name, meta: meta, query: query, path: '' }] } return []; })() : (() => { return this.formatRoutes(children, false) })() } if (!isURL(path)) aRouter.push(oRouter) } if (first) { aRouter.forEach((ele) => this.safe.$router.addRoute(ele)) } else { return aRouter } } } } export const formatPath = (ele, first) => { const propsDefault = website.menu; const icon = ele[propsDefault.icon]; ele[propsDefault.icon] = !icon ? propsDefault.iconDefault : icon; ele.meta = ele.meta || {} const iframeComponent = 'components/iframe/main'; const iframeSrc = (href) => { return href.replace(/&/g, "#") } const isChild = !!(ele[propsDefault.children] && ele[propsDefault.children].length !== 0); if (!isChild && first) { ele.component = 'views' + ele[propsDefault.path] if (isURL(ele[propsDefault.href])) { let href = ele[propsDefault.href] ele.component = iframeComponent ele[propsDefault.query] = { url: iframeSrc(href) } } } else { ele[propsDefault.children] && ele[propsDefault.children].forEach(child => { child.component = 'views' + child[propsDefault.path] if (isURL(child[propsDefault.href])) { let href = child[propsDefault.href] child[propsDefault.path] = ele[propsDefault.path] + '/' + child.code child.component = iframeComponent child[propsDefault.query] = { url: iframeSrc(href) } } formatPath(child); }) } } export default RouterPlugin;keep-alive 三级菜单失效解决方案,可在 /src/permission.js 文件中修改,以下是代码片段。router.beforeEach((to, from, next) => { const meta = to.meta || {}; const isMenu = meta.menu === undefined ? to.query.menu : meta.menu; store.commit('SET_IS_MENU', isMenu === undefined); if (getToken()) { // 三级菜单组件无法缓存问题 if (to.matched && to.matched.length > 2) { to.matched.splice(1, to.matched.length - 2) } ......以上就是SpringBlade前端UI项目3.x版本优化的具体方案。
-
记录less和scss批量生成样式 平时我们总是循规蹈矩预设一部分样式,但是又不想使用tailwind css框架,所以就用一种新方式,CSS里也是可以像执行function一样,批量生成样式,减少重复相似的样式定义。递归生成(Less)@end: 50; .generate-space(@i) when (@i > 0) { // 使用 mt-*、mr-*、mb-* 和 ml-* 工具来控制元素一侧的边距。 .mt-@{i} { margin-top: @i * 1px; } .mr-@{i} { margin-right: @i * 1px; } .mb-@{i} { margin-bottom: @i * 1px; } .ml-@{i} { margin-left: @i * 1px; } // 使用 mx-* 工具来控制元素的水平边距 .mx-@{i} { margin-left: @i * 1px; margin-right: @i * 1px; } // 使用 my-* 工具来控制元素的垂直边距。 .my-@{i} { margin-top: @i * 1px; margin-bottom: @i * 1px; } // 使用 m-* 工具来控制元素所有边的边距 .m-@{i} { margin: @i * 1px; } // 使用 pt-*、pr-*、pb-* 和 pl-* 工具来控制元素一侧的填充。 .pt-@{i} { padding-top: @i * 1px; } .pr-@{i} { padding-right: @i * 1px; } .pb-@{i} { padding-bottom: @i * 1px; } .pl-@{i} { padding-left: @i * 1px; } // 使用 px-* 工具来控制元素的水平填充。 .px-@{i} { padding-left: @i * 1px; padding-right: @i * 1px; } // 使用 py-* 工具来控制元素的垂直填充。 .py-@{i} { padding-top: @i * 1px; padding-bottom: @i * 1px; } // 使用 p-* 工具来控制元素所有边的填充。 .p-@{i} { padding: @i * 1px; } .generate-space(@i - 1); } .generate-space(@end);批量生成(Scss)// 循环生成常用属性 @for $i from 1 through 50 { // 使用 mt-*、mr-*、mb-* 和 ml-* 工具来控制元素一侧的边距。 .mt-#{$i} { margin-top: #{$i}px; } .mr-#{$i} { margin-right: #{$i}px; } .mb-#{$i} { margin-bottom: #{$i}px; } .ml-#{$i} { margin-left: #{$i}px; } // 使用 mx-* 工具来控制元素的水平边距 .mx-#{$i} { margin-left: #{$i}px; margin-right: #{$i}px; } // 使用 my-* 工具来控制元素的垂直边距。 .my-#{$i} { margin-top: #{$i}px; margin-bottom: #{$i}px; } // 使用 m-* 工具来控制元素所有边的边距 .m-#{$i} { margin: #{$i}px; } // 使用 pt-*、pr-*、pb-* 和 pl-* 工具来控制元素一侧的填充。 .pt-#{$i} { padding-top: #{$i}px; } .pr-#{$i} { padding-right: #{$i}px; } .pb-#{$i} { padding-bottom: #{$i}px; } .pl-#{$i} { padding-left: #{$i}px; } // 使用 px-* 工具来控制元素的水平填充。 .px-#{$i} { padding-left: #{$i}px; padding-right: #{$i}px; } // 使用 py-* 工具来控制元素的垂直填充。 .py-#{$i} { padding-top: #{$i}px; padding-bottom: #{$i}px; } // 使用 p-* 工具来控制元素所有边的填充。 .p-#{$i} { padding: #{$i}px; } }
-
前端项目构建产物在本地运行,如何解决接口跨域问题? 如果你无法修改后端,但可以控制前端,可以通过一个中间层代理服务器来解决跨域问题。例如,你可以使用一个 Node.js 服务器作为代理来转发请求。 你可以使用 http-proxy-middleware 代理请求,设置一个简单的 Node.js 服务器,将 API 请求代理到后端,避免浏览器的跨域限制。安装 http-proxy-middleware和express:npm install http-proxy-middleware express创建一个 server.js 文件:const express = require('express'); const path = require('path'); const { createProxyMiddleware } = require('http-proxy-middleware'); const app = express(); // 处理静态文件 app.use(express.static(path.join(__dirname, 'dist'))); // 假设后端 API 地址是 http://backend-api:3000 app.use('/api', createProxyMiddleware({ target: 'http://backend-server.com/api', changeOrigin: true, // pathRewrite: { '^/api': '' }, // 可选,去掉请求中的 /api 部分 })); // 为了支持 Vue 的 Hash 模式,返回 index.html 来处理所有路由 app.get('*', (req, res) => { res.sendFile(path.join(__dirname, 'dist', 'index.html')); }); const port = 3000; app.listen(port, () => { console.log(`Server is running on http://localhost:${port}`); });启动 Node.js 服务器node server.js 这样,当你访问 http://localhost:3000/api/... 时,所有的请求会被代理到后端服务器 http://backend-server.com/...。同时,前端的静态文件会从 dist 文件夹中提供。
-
vue3 + element-plus 设置表格自动滚动 前两天一朋友问我,说element-plus的table表单自动滚动会出现卡顿的问题,估计是没有使用requestAnimationFrame(请求动画帧)导致肉眼可见的卡顿。于是,我整理了下他的需求,给他写了一个demo,具体代码如下:<template> <div> <!-- 设置表格高度,确保有足够的空间显示滚动条 --> <el-table :data="tableData" style="width: 100%; height: 300px;" ref="tableRef" > <el-table-column label="ID" prop="id"></el-table-column> <el-table-column label="Name" prop="name"></el-table-column> <el-table-column label="Age" prop="age"></el-table-column> </el-table> <el-button @click="startScrolling">Start Scrolling</el-button> <el-button @click="stopScrolling">Stop Scrolling</el-button> <el-button @click="scrollToTop">Scroll to Top</el-button> </div> </template> <script> import { ref } from 'vue'; export default { setup() { // 设置一组假数据 const tableData = ref([ { id: 1, name: 'John', age: 25 }, { id: 2, name: 'Jane', age: 22 }, { id: 3, name: 'Tom', age: 30 }, { id: 4, name: 'Lucy', age: 27 }, { id: 5, name: 'Mike', age: 35 }, { id: 6, name: 'Sara', age: 28 }, { id: 7, name: 'David', age: 33 }, { id: 8, name: 'Emma', age: 26 }, { id: 9, name: 'Liam', age: 29 }, { id: 10, name: 'Olivia', age: 24 }, { id: 11, name: 'Sophia', age: 26 }, { id: 12, name: 'Jackson', age: 31 }, { id: 13, name: 'Ava', age: 23 }, { id: 14, name: 'Isabella', age: 32 }, { id: 15, name: 'Ethan', age: 27 } ]); const tableRef = ref(null); let animationFrameId = null; let isScrolling = false; // 滚动表格函数 const scrollTable = () => { if (!tableRef.value) return; // 拿到 table const table = tableRef.value.layout.table.refs; // 获取表格的滚动容器 const tableBodyWrapper = table.bodyWrapper.firstElementChild.firstElementChild; console.log('tableBodyWrapper', tableBodyWrapper); if (!tableBodyWrapper) return; const scrollHeight = tableBodyWrapper.scrollHeight; const scrollTop = tableBodyWrapper.scrollTop; const clientHeight = tableBodyWrapper.clientHeight; // 如果滚动到底部就停止 if (scrollTop + clientHeight >= scrollHeight) { cancelAnimationFrame(animationFrameId); isScrolling = false; return; } // 向下滚动 tableBodyWrapper.scrollTop += 1; // 继续执行下一帧 animationFrameId = requestAnimationFrame(scrollTable); }; // 启动滚动 const startScrolling = () => { if (!isScrolling) { isScrolling = true; scrollTable(); } }; // 停止滚动 const stopScrolling = () => { cancelAnimationFrame(animationFrameId); isScrolling = false; }; const scrollToTop = () => { if (!tableRef.value) return; // 拿到 table const table = tableRef.value.layout.table.refs; // 获取表格的滚动容器 const tableBodyWrapper = table.bodyWrapper.firstElementChild.firstElementChild; if (tableBodyWrapper) { tableBodyWrapper.scrollTop = 0; // 将滚动位置设置为 0,回到顶部 } }; return { tableData, tableRef, startScrolling, stopScrolling, scrollToTop }; } }; </script> <style scoped> /* 可以自定义样式 */ </style>